This article shows two examples to explain how border tiles are laid in ViSoft. Tiles of the manufacturer Original style are used. You can download the Original style database in the update manager.
Example one tile border

Step 1
Open the tile browser in menu Tile. In the example tiles 8021V, 8022V, and 8023V from the Odyssey series from Original Style are used. Create a tileset with a right click> Create tileset. Place tile 8021V on the floor, set the tile orientation to ‘quad'(ratic).

Step 2
Open menu Tile | Region. Draw a region, the size of a bathtub for example. After drawing you can set the exact properties.

Step 3
Go to menu Tile | Borders. Select tile 8023V under border tile. Click on button Region and click on the floor area. The border is placed. Doubleclick on the border for free construction options. Drag the white points to move the border.
Example two: multiple tile borders

Step 1
Start a new project and select an L-shaped room from the quick wizard. Go to menu Tile in the tile browser. Select the following tiles (hold CTRL) from the Original Style database from serie Victorian floor tiles: 7104v, 7504v, 7704v, 7706v, 7121v, 7518v, 7639v and 7725v. Right-click and select Create tileset. Fill in the data. Open the tab Module assistant in the tile browser.
Step 2
First, we create a base pattern. Open the tileset and drag tile 7104V twice and 7704V and 7504V once to create a square. Check the preview and press OK. Place the pattern on the floor and turn the tiling angle 45 degrees.

Step 3
Go to menu Tile | Borders. This step explains how to set the first border and to create a neat cutting plan for the base pattern.
Go to floor view and open menu Tile | Borders. Select border tile 7121v. Click on the button Free to draw a region over the centre of the tiles. Make sure snap to tile centre is on. After placing the border, set the orientation to the right (the border is placed outside the base region). Draw a free region against the inner outline of the border. Delete the base pattern and place it again inside the border. The outer region is now free of tiling.

Step 4
Open the module-assistant to set the next border. Rightclick on the button Module under way of laying tiles. Press New to start a new module.
Drag tiles 7518V (triangle) and 7639v(diamond) to the blank space. TIP: While dragging, right-click to rotate the tile. To get the diamond in the proper angle, open More… to use the parameter Free angle. Connect the tiles horizontally. Press OK. Click on Region to place the strip.

Step 5
Set the border tile 7121V again. Select Region and place on the floor.
Select tile 7725V. Repeat steps to place.
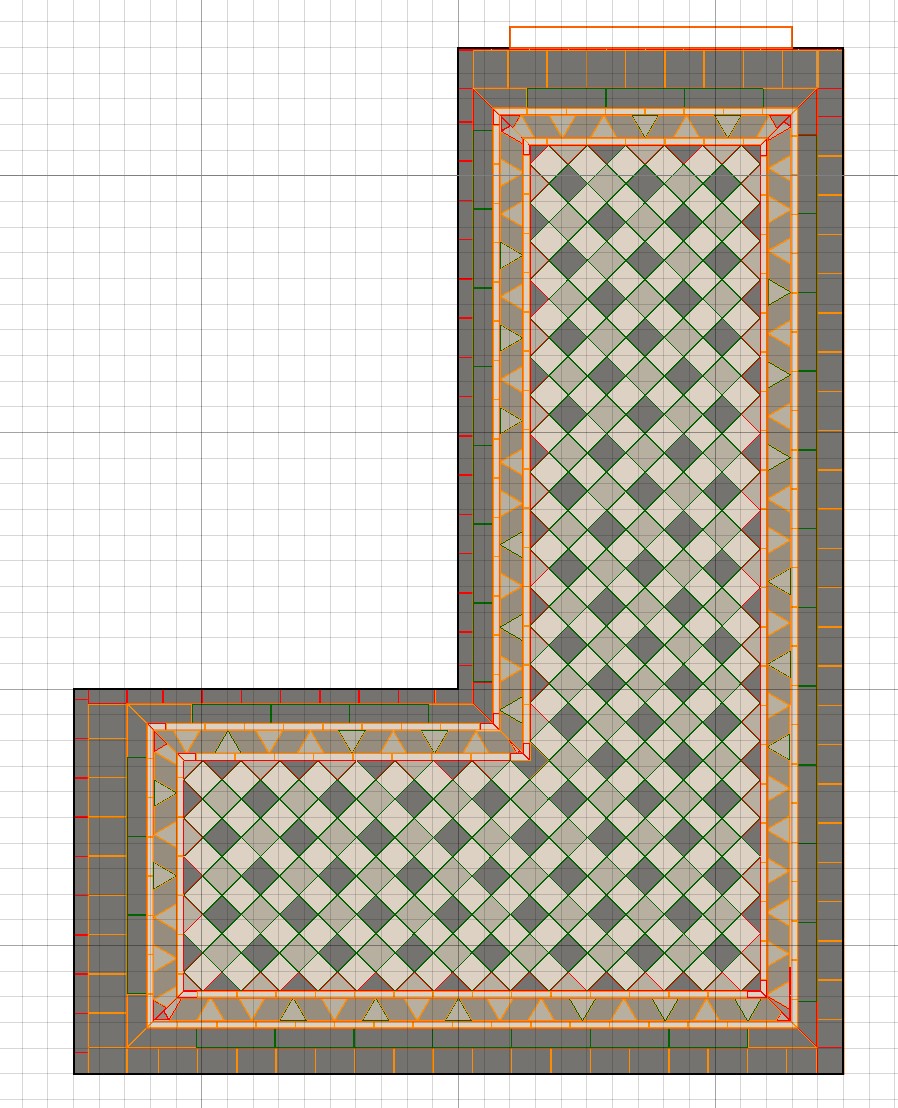
To finish the floor tiling, set base tile 7706V in menu Tile | Place | Tile and place in the outer area. Select the right tile position and joint setting for a nice tiling cut.