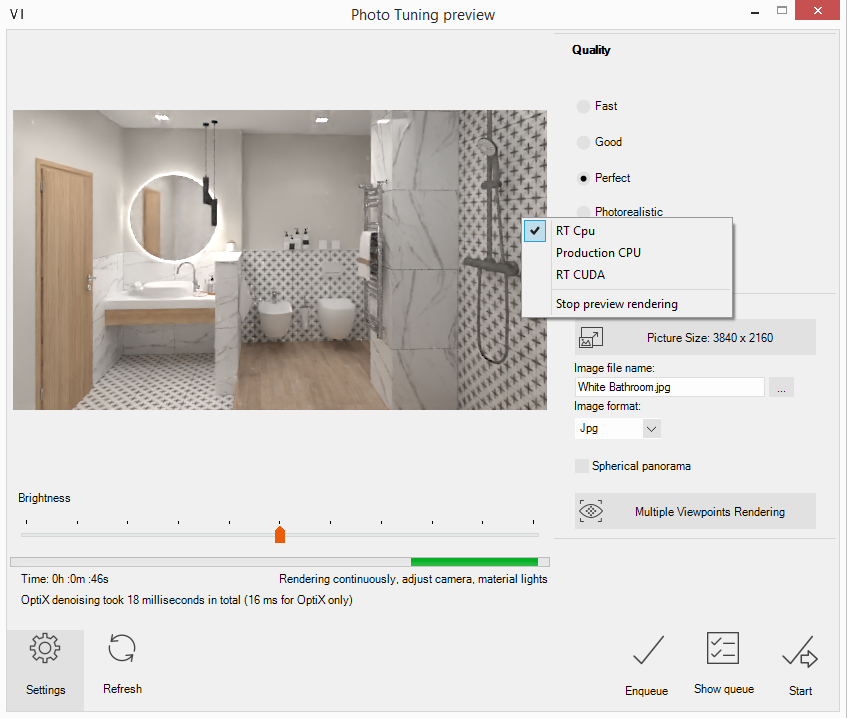
With ViSoft Phototuning you can render lifelike media of the project. This module needs to be activated separately from Premium. In ViSoft the rendering software V-Ray is integrated. Rendering is a graphical design term. To render relates to the processing of images for a film or animation.
A lot of elements are of importance in making a great render. Light settings are crucial, it’s important to create realistic lightning. Other important factors are camera position, used materials and textures, settings of the V-Ray rendering software.
Get started
Before you start with Phototuning, make sure you set up the lighting, materials, camera and viewpoints. The setting of light is certainly difficult at the beginning. Try to prevent setting the lights too bright and keep them behind or next to the camera. Start Phototuning in menu View | Advanced or use hotkey F10. The Phototuning preview window will open (see image below). The preview window is on the left side. The aspect ratio of the preview is equivalent to chosen picture resolution. Below it is the Exposure Correction slider. By using it you can make picture
By right clicking into the preview picture you can select three different ways for preview creation
- RT CPU: RealTime preview based on the processor computing power.
- CPU Production: render in the preview window, also based on the processing computing power.
- RT Cuda: Realtime preview based on the graphic card’s computing power.
RT CPU and RT Cuda are on-going progressive processes that keep rendering. First results are shown quickly. As time goes on more and more noise is removed. You may change the viewpoint or light settings at any time. The changes are detected and creating of a new preview begins. When using CPU Production you need to click

Quality provides four predefined quality options:
Fast
The setting fast doesn’t calculate soft shadows or natural lighting and leaves all quality settings on a low level. This mode is useful to get a fast overview of the brightness of all lights in the current scene. Use this mode always
Good
This level uses soft shadows with low quality and some other settings that increase quality. Use it to perform enhancements on details and to create pictures with low quality.
Perfect
This adjustment computes softer shadows with higher quality and increases other quality settings.
Photorealistic
This option calculates quality soft shadows. All other necessary quality settings have high values. You should use this mode when light and material settings have been already finished. The result of the automatically optimized settings is a

Use Output to select the resolution. Choose from the typical resolutions, or type a custom size in pixels. Think about the intended use to define the adequate resolution for presentation. Try to match the resolution of the device you want to present it on, go lower or higher and it reduces the quality. Read here more about how to calculate the DPI. Higher resolution means longer render time.
Under Image file name fill in the name of the image. Press … to change the save location. Use Image format to save to JPG, PNG or TIF. Enable Sferische camera if you want to render a panorama and use is for software like KRPano.
Press the button Multiple Viewpoints Rendering to select more viewpoints, and enqueue them all at once to render. In menu View | Camera
Explanation of the other functions: Refresh: the preview starts a new rendering. Enqueue: Add a task to the render queue. You can add tasks and start the renders at a later time. Show enqueue: open the
Settings:
Press the button Settings to set up the preferences for Phototuning. The ViSoft System Preferences window is

Use V-Ray frame buffer for rendering
Enable denoiser
diminishes the noise in an image.Vermindert eventuele ruis in een afbeelding.
Auto-exposure
Auto Exposure is an additional pass before the preview rendering starts. It detects
Glare Effect
Creates light beams around objects with high intensity.
Enable Chamfer Effect
Use
GI Saturation
GI Saturation enables
