
The HTC Vive comes with a lot of hardware and accessories. But how do you ensure that you get started as soon as possible? On this page you can read how to connect, install and adjust the HTC Vive, so that you enter the world of VR as comfortably as possible.
What do you need to install the HTC Vive?
- The complete HTC Vive package
- An internet connection
- A ruler
- A mirror
- At least half an hour free time
- Optional: 2x tripod + 2x connector
** Attention ** Make sure that you always keep the lenses of the HTC Vive out of direct sunlight. This way you prevent a burned in screen.
Step 1: Connect
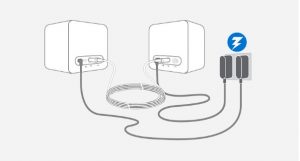
Connect the base stations
- Place the supplied mounting brackets in the wall at least 2 meters high, up to 5 meters opposite each other. You can also opt for a tripod or bookshelf,
- Place or screw the base stations at the chosen location. There must be nothing between the 2 base stations.
- Connect the base stations to a power outlet using the supplied power adapter. They need an unobstructed view of each other.
- Remove the protective film from both base stations.
- Do you see a green light and the letter b and c? Then they are well connected! Do you see a purple light? Then use the supplied sync cable and switch with channel from channel a to channel c.
Connect the VR glasses
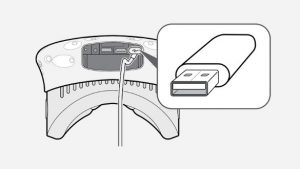
- Take the link box out of the box and connect it to the socket with the power adapter.
- Connect the link box to your VR pc or laptop using the supplied usb cable.
- Connect the link box on the other end to the HDMI output of the video card in your PC or laptop with the supplied HDMI cable.
- Connect the 3 cables coming from the HTC Vive to the other side of the link box.
- Remove the protective film from the HTC Vive.
Step 2: Install the play space
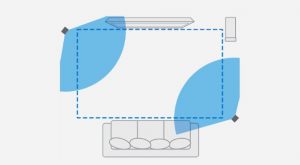
Option A: standing. If you have an empty space of at least 3 x 3 meters at your disposal.
- Remove all tables, chairs, pets and children from your play area. \ n2. Make sure that floor is free so that you do not stumble anywhere. \ n3. Place your VR PC or laptop outside the playing area. \ N4. Make sure that sensors are properly aligned with the chosen area and can see each other. \ n5. Clearly plan the area during the software installation.

Option B: sitting. If you have a limited space at your disposal, or simply prefer to sit during VR.
- Put the base stations at least 1.5 meters apart, with a seat in the middle.
- Make sure that all objects are at least an arm’s length away from you when you sit on your chair.
- Clearly plan the area during the software installation.
Step 3: Installing the PC or laptop
Video card drivers

- Download the latest drivers from your video card. \ N * Download NVIDIA drivers \ n * Download AMD drivers \ n2. Open the file and follow all the steps in the installation process. \ N3. Restart your laptop or PC after installation.
HTC Vive software
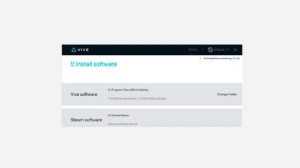
- Download the HTC Vive setup file. This includes the Vive desktop app, Vive Home VR experience and the Steam client. \ n * Download the HTC Vive setup \ n2. Perform the setup on your VR PC or laptop. \ N3. Make sure you go through all the steps of the installation process. \ N4. Now your PC or laptop and the HTC Vive understand each other and are ready for use.
Step 4: Adjust
** Adjusting the headband **. Naturally you want to get as comfortable as possible VR with the HTC Vive. Make sure that the headband is properly adjusted.
- Put the glasses on your head and pull the headband at the top back until the glasses are firmly on your head.
- Use the Velcro on the side to loosen or tighten the glasses.
- The HTC Vive sits comfortably on your head when the VR glasses are pointing forwards, not upwards or downwards. To show the image sharply, you can get started with the Interpupilar Distance, the distance between your pupils, and the lens distance relative to your face.
Adjust the lenses and the lens distance
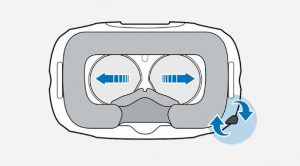
Adjust the lenses to your IPD
IPD – your Interpupilar Distance – is the distance between your pupils. It affects the way you focus your eyes in VR. The Vive is calibrated for most IPDs, but some people may experience a blurry image with the default settings. This way you can adjust the VR glasses to your IPD.
- Stand with a ruler as close as possible to a mirror.
- Look straight into the mirror and keep the ruler at eye level against your face.
- Write the distance in millimeters.
- Put the HTC Vive on your head.
- Adjust the distance between the lenses with the button on the bottom right of the VR glasses. \ N6. Turn the knob until you see the correct number of millimeters.
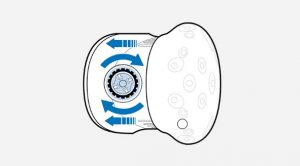
Adjust the lens distance
The lenses may be too close to your face because you wear glasses, for example, or have long eyelashes. In that case, adjust the distance between your face and the lenses.
- Pull out the 2 rings on the side of the HTC Vive.
- Put the VR glasses on your head.
- Turn the knobs to move the lenses closer to you or further away from you.
- If the lenses are clear of your face, you have the lens distance well adjusted.