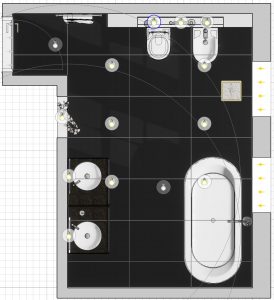
The Light Templates function calculates automatically a lighting plan for the room.
It places Fill- and Focus lights.
In the menu View | Light you select Light templates…. On the left side of the screen, a few example templates will appear that you can choose. You can also create your own template with the Create button.
The Fill lights are the normal lighting for the room.
Focus lights are for highlighting certain spots in the room. for example hollows, basins and walls.
Select the wanted brightness, IES Light Profile, and spacing. you can also select which lamp to use.
In the Explorer of the side browser, you can select light groups, move them, change properties or delete them.
Global Illumination (GI) is one of the visualization effects that you can control. The exposure in your project should improve a lot just by turning on this feature. GI refers to a scene where the lighting is reflected around and on objects (indirect lighting). This feature provides secondary light beams, creating a pleasant and balanced exposure.
Configure the GI function in menu View | Advanced.
Left: No GI. Right: GI is on
Note that: Global Illumination doesn’t show in PhotoTuning renders. This article described which light settings affects your rendering.
If you want to share a Visoft 360 panorama on Facebook, you need to edit the (Efix) metadata of the image so it gets recognized as a 360-photo. You can check the Facebook 360 documentation here.
Step 1
Use Phototuning to render an image; set the resolution to 2:1 (e.g. 6000×3000) and enable the option Spherical camera.
Step 2
For editing the metadata you can use the online tool The Exifer.
Drag & Drop the image created in ViSoft to this tool and press eXif.me.
Browse to the last tab named xmp gpano tags and scroll down until you see ProjectionType (4th from bottom).
Fill in: equirectangular. And press Go.eXifing.
The metadata is modified, close the editor.
Press download.me to download the image with the new metadata.
The image can now be uploaded on Facebook as a 360-photo.
Use menu View | Advanced for creating photos, videos, and panoramas of your project.
For the presentation of your project, you could use the animation. Select viewpoints you would like to use. If you used the navigation panel to save custom viewpoints, these will appear for use as well. Best to start in the middle of the room, to avoid hidden walls. Use the arrows up and down to change the order. Use speed to slow or speed up de change of viewpoints. Start the animation with the play button. If Repeat is activated, the animation starts automatically again after the last viewpoint. Use F11 to open/exit full view screen.
The animation can be saved to a video. Use the button save video to publish on ViSoft360, hard disc or YouTube.
Use the Fly Around button to start an animation around the space. Use the lower taskbar to activate Auto-hide walls and right-click to auto-hide connected sanitary or murals as well.
With Visualization effects adjust reflections, shadows and the global illumination. Lower the settings or disable the visualization effect if your graphic card is giving trouble. The same goes for 3D Settings (use context menu to disenable).
Use the button Save picture to save a JPG or BMP file of your current view. You can save a panorama to create a 360 image of the room. Set the viewpoint in the middle of the room, then press save. The window Panorama rendering opens.
Phototuning is an extra module, to render lifelike images. The Media Browser shows all the created images and gives fast access to ViSoft360. You can choose which rendering engine to use: 3D, phototuning and virtual reality. Select a folder to save the panorama. Create make to render a panorama.
In this article you can read step by step how to upload media to your ViSoft360 account to share it with your customers.
Use the submenu Light to adjust lighting in your project. Sometimes you will want to make your project or part of it brighter or darker. Besides that you can simulate ambient light effects. By using sunlight lighting mode you may show how portal light is entering through windows. You can also simulate sunrise and sunset.
ViSoft Premium uses four different types of lights: Point lights: equally dissolving inner lights; Spotlights: narrowly shaped inner lights creating a circle with a thin ray of light; Portal lights: outer lights entering through apertures such as windows, doors or holes; independent of the sunlight; Sunlight: outer light source entering through apertures, which casts shadows in regard to its position.
Point
lights are set automatically by the program in regard to the shape and size of
your room. Portal lights are also set automatically for each aperture. You may
manually add additional point lights as well as spot lights. Each light can be
switched on / off. You can also set properties like position, radius, brightness
and color for each of the lights.
Position of light sources can be set in 2D views Floor and Wall or in 3D. When setting brightness it’s recommended to switch to 3Dview. In this way you will be able to notice the effect of increased or decreased brightness.
By clicking the button Inside Lights all point and spotlights that exist in your projects are enabled. When you click button Sunlight you will switch off all of the point and spotlights. Portal lights of windows and holes will be enabled as well as the sunlight. You may still manually switch the sunlight and all other lights on or off and use them in any combination.
Use submenu Lights to set point, spot and portal lights. Use submenu Sun & Sky to set the position and brightness of the sun as well as sky settings.
Light tab
Use the button Point Light and Spot Light to place lights in the room. Use the properties to edit color, brightness and radius amongst other things. Global highlight sets the general light value. The button Properties opens the window Light properties with extra settings, as temperature and IES light profiles.
Turn drop shadow on or off. Use Temperature for a warmer or colder color (Kelvin: below 5500 is warm, above cold). IES light profiles create a realistic bundle of light. The profile you choose is visible both in 3D-view and in Phototuning.
Display light cones in 3D (spotlights only)
Setting the lights is often a precise job. To see the effect better, enable a high light selection. In 3D-view open the context menu (right-mouse click), select 3D settings> highlight selection. The direction and radius of the spotlight is marked. This option is only accessible with spotlights. It can be useful to switch off other light sources to see the effect of the light. And choose a vibrant color during the set up like bright pink.
Sun & Sky
Position of the sun’s rays can be viewed in 2D floor view. This makes it easier to adjust the position of the sun. On the image below you can see how the sun’s rays come in (the yellow areas).
If you want to replace the background in ViSoft with an image, sky or 360-photo, visit this article.
Fast consulting mode is perfect when you are advising customers and don’t want to see all the menus and functions. You work from the side browser only. Start this mode with CTRL + F11 and exit with Escape.
You can adjust settings for the side browser in the ViSoft preferences. Set shortcuts and choose which menus you want to work with.
In menu View| Material you can easily edit the materials of walls, murals, objects and other surfaces. Select the surface or object you want to change. A preview appears in the right menu. Open the Material libraryto select and place material. It’s also a possibility to import custom material based on an image, use for example textures from Vismats. Use the tabs simple and advanced to add or change bumpmaps and reflection etc.
In ViSoft it is possible to change the surrounding of the project to a cloudy sky, a photo, or even a 360-spherical image.
Go to menu View | Light | Sun and sky. Look under Sky properties to change the style of the background. Disable sky (same as inside lights). Use the dropdown menu from Sky to choose a sunny, cloudy or even a stormy sky.
It is also possible to import your own environment file to use as a background. Press the import button. Select the image, give it a name and select the type in the import window. Press OK. You can use the parameters to set the image, and use Align to view: the image will adjust automatically to the current viewpoint.
360 panorama
If you want to use a 360-photo, take care it has a high resolution (8k). The rotation, saturation and horizon height can be adjusted. These spherical images are suitable for apartments with a lot of windows, to create an extra wow-factor. Adding a 360-panorama goes the same as explained above, use import and select type spherical.
Suitable 360 images can be found when you use the search term “spherical panorama” Google images. Search for a high resolution, for example, larger than 4 MP. On Viz People you can download six ‘spherical Skies’ for free.
Change the viewpoint with one mouse-click in menu View | Camera.
Use the explorer (viewpoints) in the left-browser (binoculars), or change the viewpoint using the buttons in the right menu. Top, back, left, center, right and front are all automatic viewpoints. In the explorer, you will find some more automatic viewpoints as best corner, from the smallest wall…
Change the view easily with the cursor keys ←→ to rotate and ↑↓ move back or forward. Or use WASD, + QE to move the view up and down.
Use the Properties parameters to change camera set up. You can also change the lens, to wide angle for example.
Enable curtains to see the viewpoint in the chosen image resolution. This makes it easy to check if all details are visible before you save or render the image. You can use turn on the grid to check the composition.
The function optimize perspective minimizes any distortions of diagonal lines in the camera angle. Use this option when joints appear irregular or cut. This function is disabled for viewpoints with very oblique views.
The navigation panel is a helpful tool to see where the camera stands in the room. You can drag the circle which represents the camera, and rotate the field of vision. Use the navigation panel to save custom viewpoints. If you are satisfied with your current viewpoint, save it by clicking on one of the circles numbered 1 to 10.
Note: you don’t have to use the save button. Only if you want to rewrite an already saved viewpoint, use the save button.
 In the menu View | Light you select Light templates…. On the left side of the screen, a few example templates will appear that you can choose. You can also create your own template with the Create button.


 Use menu View | Advanced for creating photos, videos, and panoramas of your project.