First, check which graphics card you currently have. There are 2 ways to do this:
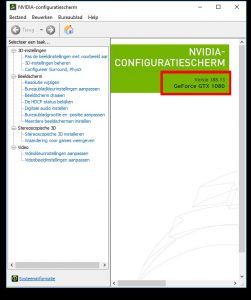
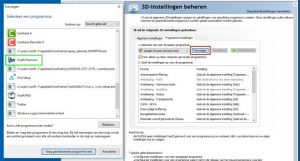
1) Right-click on your desktop background (wallpaper) and > select NVIDIA-Control Panel. The application will pop up, this can take a while. In the ‘home’ screen is stated which Graphic card you have.
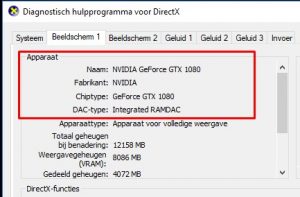
2) The second way is to use the diagnostic tool of Directx. Press Windows button + R and type dxdiag. Select Display 1 and under chiptype, you can find your graphics card.
Step 2
Go to the Nvidia driver website to download the newest drivers. Fill in your information an hit ‘search’. Next hit ‘download’.
Step 3
Open the downloaded installation file and follow the steps. After completion, your Graphics card is updated.
Check if you have administrator rights (if not, contact your IT-department) and if your antivirus software lets you install ViSoft. When in doubt, shut it off for the duration of the installation.
You can find the system specifications for ViSoft Premiumhere.
Close all other programs and make sure you have a stable internet connection if you are installing the online setup.
Send an email to info@visoft.de if you wish to receive an installation file to test ViSoft.
The installation:
Start the .exe file out of your download folder. Follow the steps in the program. After the installation, the pc needs to be restarted. Then you can start ViSoft Premium.
Registration and activation without a dongle
Extend the following information when you are installing for online license. Otherwise, you can skip this step.
If you are using ViSoft for the first time as a new customer you need to create a new account. Please use the same e-mail address as the one you used for ordering ViSoft.
Fill in all your contact info and hit register. After registration, you will get a confirmation mail, check your spam folder if you do not see it in your inbox. Using ALT + TAB you can switch to your email program (without closing the installation).
Log in.
After registration, you choose the option to try out. A rental (online) license works without a dongle. In this case, a stable internet connection is needed to start ViSoft. If you bought ViSoft with a dongle, plug it in now (you still select try out). A migration tool will appear in the update manager, which transfers your license to your dongle.
Remote Assistance
A ViSoft Teamviewer shortcut appeared on your desktop. This program allows us to log in remotely to your pc to assist you when you have a question or problem. Please start the Teamviewer application before calling. If you use an own TeamViewer, close it before starting the ViSoft one.
Firewall Settings
Your Firewall security might block the ViSoft update server. The following addresses need to be accessible for ViSoft to be able to install updates, grant them access in your firewall settings:
After installation, you can start choosing which tile- and sanitary brands you want to use. In ViSoft, open the update manager and select the needed brands. You can close the update manager, it will keep downloading.
Projects path
In ViSoft under File >Settings > tab Common( shortkey CTRL+K) under project location, you can change the path where to save your projects. By default they are saved at c: \ViSoftCreative\Projekte.
Network installation ViSoft data files
After the installation of ViSoft, you can choose to set some of the data in a network folder to share with multiple users.
All paths are saved in the settings.xml file in the Userdata folder.
The settings.xml can be changed on one pc and then be copied to all other PC’s with ViSoft installed.
Close ViSoft before you change the settings.xml file. You can find a more detailed explanation of network saves here.
Network paths
Installation with dongle
Installation online (no dongle)
Software
C:\ViSoftCreative
C:\ProgramFiles\ViSoft\ViSoftPremium
Utils
\Utils
\Utils
Data
C:\ProgramData\ViSoft\ViSoftPremium
Sanitary
\Arge
\Arge
Tiles
\tiles
\tiles
UserData
\Userdata
\Userdata
Projects
\Projekte
\Projekte
Save location of Tile boards (Created with the board assistant)
C:\ViSoftCreative\Tiles\boards\
Save location of Tile patterns (Created with Tile > patterns) C:\ViSoftCreative\Tiles\patterns\
Save location Murals Library (Grouped sanitary objects) C:\ViSoftCreative\Data\CustomMurals\</custom_mural- folder>
Save location sanitary library C:\ViSoftCreative
>The locally installed sanitary library can be found at c: \ViSoftCreative\Arge. Move all the folders to the network location. Don’t add Arge in the path, otherwise, ViSoft will create an extra arge folder. For example, F:\ViSoftCreative is correct, place the arge folder in there)
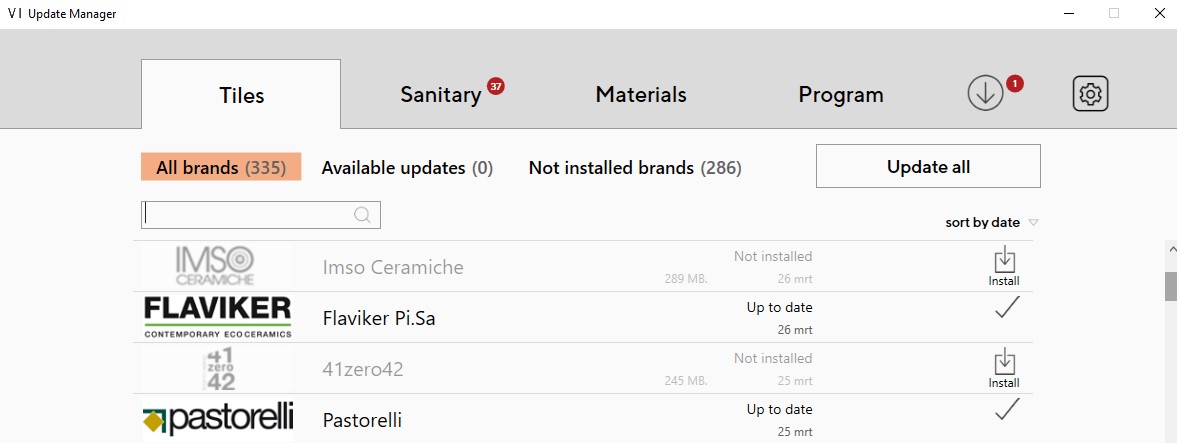
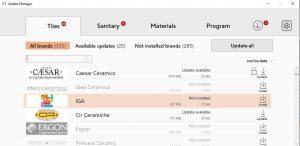
When first starting ViSoft, the tile, and sanitary libraries are empty. With the Update manager, you can download all the brands you need. You find the update manager in the top bar:
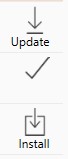
The following window opens. To the right of the brands, you can select to install or update. If there is a checkmark next to it, the brand is installed and up to date.
Rightclick on a brand to expand the extra menu.
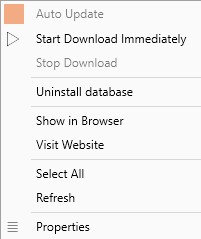
Auto Update: When checked, ViSoft will keep this brand automatically up to date. You can select a time to update in the Preferences > Update. (CTRL +K) Open in Browser: Opens the brand in the browser. Properties: Show the database properties of the brand. Uninstall Database: Delete the brand from your libraries.
Some brands are locked by default, you can spot these with a lock icon next to them. For these, you need permission from the manufacturer to use them. Contact your agent or dealer to get access, send the permission mail to MAIL. The mail of the manufacturer needs to have their logo in it.
Include your customer ID as well, you can find this under Help > Registration info.
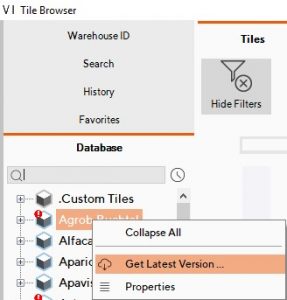
Updating from the sanitary or tile browser
You can update brands directly in the tile and sanitary browser. The brand has an update if it has a red exclamation mark next to it. Rightclick on the brand and select Get Latest Version...
You can save projects and others on a network disk in order to have them accessible to multiple computers and users.
The network setup of the Tile library is described in this article.
On a local installation of ViSoft Premium, all the paths are in the file: c:\ViSoftCreative\Userdata\settings.xml
The file settings.xml can be altered on one pc and then copied over to the others to have the same settings on all PC’s.
Attention: Close ViSoft Premium before you change anything in the settings.xml file.
save path
Dongle installation
Online license installation
Software
C:\ViSoftCreative
C:\ProgramFiles\ViSoft\ViSoftPremium
Utils
\\Utils
Data
C:\ProgramData\ViSoft\ViSoftPremium
Sanitary
\Arge
\Arge
Tiles
\Tiles
\Tiles
UserData
\Userdata
\Userdata
Projects
\Projekte
\Projekte
Project location (visualizations and drawings)
In the ViSoft preferences > General, you can change the location of where the projects are saved.
By default, this is C:\ViSoftCreative\Projekte
Click on the 3 dots to the right to select your own path to save your projects in.
Projects path in settings.xml:
<projects-folder>C:\ViSoftCreative\Projekte\</projects-folder>
Save location of Tile boards (Created with the board assistant)
C:\ViSoftCreative\Tiles\boards\
Save location of Tile patterns (Created with Tile > patterns)
C:\ViSoftCreative\Tiles\patterns\
Save location Murals Library (Grouped sanitary objects)
C:\ViSoftCreative\Data\CustomMurals\</custom_mural- folder>
Save location sanitary library
C:\ViSoftCreative
>The locally installed sanitary library can be found at c: \ViSoftCreative\Arge. Move all the folders to the network location. Don’t add Arge in the path otherwise, ViSoft will create an extra folder. For example, F:\ViSoft is the correct path, place the Arge folder in here.
The ViSoft with dongle installation is placed on the C: disk in the folder ViSoftCreative, including the tile and sanitary libraries.
An online license is placed on the following C:\ProgramFiles\ViSoft\ViSoftPremium and the data in C:\ProgramData\ViSoft\ViSoftPremium\.
After the installation, you can move the tile library accordingly to the following steps.
Close ViSoft Premium before starting this process.
Tiles:
Move the folder C:\ViSoftCreative\Tiles\Fliesen (DONGLE) or C:\ProgramData\ViSoft\ViSoftPremium\Tiles (ONLINE) to the new location of choice. For example on your D: disk create a folder Visot_Tiles. If you have all brands installed (don’t do this) the folder will be 31GB so it will take some time.
Now you have to change the path in the settings.xml file to the new location.
Locate the file in c:\ViSoftCreative\Userdata (DONGLE) or C:\ProgramData\ViSoft\ViSoftPremium\Userdata (ONLINE) and open it in notepad.
Find the line with the tiles folder:
and change it to the new path:
Attention: Don’t include the Fliesen folder in the path.
Start ViSoft and select the new location in the pop-up.
For the outputs, you can set a corporate identity using logo’s, footnotes and text labels. These settings are saved for all new projects. It can happen that after an update the settings are removed.
Adding a logo
In the output select the Print Settings. In the menu select the button with 3 dots on it to add a logo, you can use a BMP, JPG or GIF file. Check the box above the logo on the position you want to use. The numbers accord to the left (1), middle (2) and right (3) of the page. You can also select if you want them on the top or bottom of the page.
It is also possible to add a logo with/or only text, for example, to have add disclaimer and a logo. In the example size 850px-115px is used.
Footnote
Another way to add a disclaimer is to use a footnote. This can also be found in the print settings. This footnote can only be 1 line long and will be shown on every page.
Bottom Frame Information
In the Print Settings, you can turn on or off the Bottom Frame Information. you can also add the information to the frame and check or uncheck what you want to be displayed.
Attention: make sure you have the option labels and frames checked in the Drawing Layers.
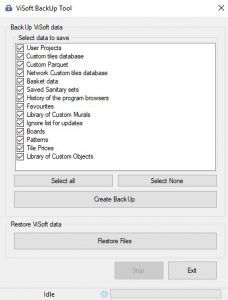
Use the ViSoft Backup Tool to archive or to make a backup of your data. Make sure ViSoft Premium is closed. The BackUptool.exe can be found in the folder ViSoftCreative on a local hard disc (c:\VisoftCreative\). Archives can be made of projects, custom tiles, objects, baskets, auto boards, prices… The ZIP-files can be used to restore data.
Mark the data you want to save in the archive file and select create backup. Select a folder and archivename. The packing process can take a little while, depending on the size of the data.
To restore data, click Restore files and select the archive zip file. This could also take a while, depending on the size.
It is recommended to make a backup regularly. Best to use multiple save locations, like an external disc, NAS or the cloud.
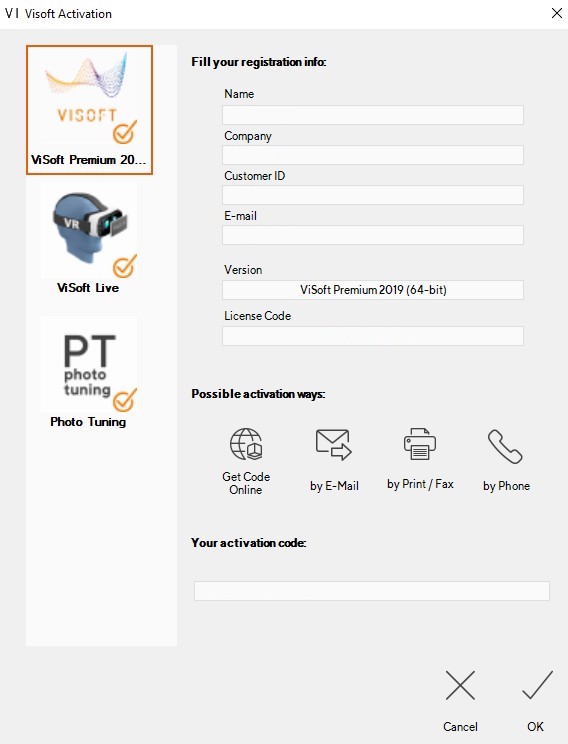
Plug in the ViSoft PremiumUSB dongle in to one of your USB ports. When starting ViSoft premium for the first time it will need a activation code. This activation process is done automatically a problem occurs. If there is a problem a activation screen will pop up, please enter all info except HardwareID. You can find your customer id on your invoice.
You can get a activation code in a few different manners:
Online activation: Click on the button to get your code online. Via e-mail: Cilick on the e-mail icon to send a mail to lizenz@visoft.de Via Phone: Click on the button by phone
Select the Ok button.
When you have multiple work spaces you need to do this process on each pc.
No e-mail client on your ViSoft computer? Send a e-mail to lizenz@visoft.de from a different pc:
Bitte freigabe für: ViSoft Premium versie xxx ( Add your version on the xxx; e.g. 2018-64 bit.)
Hardware ID: xxxxxxxxxxxx ( in here copy the harwareID in the activation screen)